Thursday, April 11, 2019

Speed Up Speedgrader with Annotate Pro


Do you every feel like this when providing feedback to your students?

Image result for repetitive and redundant gif

You keep providing the same comment student after student.


This edition of the Friday Five introduces a Google Chrome Extension that allows you to more easily provide meaningful feedback on work collected in Canvas. The extension is called Annotate Pro. (Note: This extension is a "freemium" tool. This means it has a bunch of features that are free and others you can pay for. I am only highlighting free features.)


1. What is Annotate Pro?

Annotate Pro is a free extension that allows users to create comment banks that can be used when providing feedback in Speedgrader, Discussions and on Rubrics in Canvas. It can also be used with Google Docs and Word, but this post will focus on Canvas. 

2. How does it work? 

The 2 minute video below demonstrates the use of Annotate Pro in Speedgrader.


3. Can I create my own comments?

Yes, each user can create their own library of comments. Comments can include text and links to supplemental resources. You can even download your comments so you can share them with a colleague. 

4. Will this tool limit personalization of comments for students?

When providing feedback, you often are providing similar comments to students. Once you place a saved comment on a student's work, you can still edit the comment and add additional, specific information. You do not loose your ability to create custom comments while utilizing Annotate Pro.

5. How do I add an extension to Chrome?

  1. Go to the Chrome Store
  2. Search for Annotate Pro
  3. Click Add to Chrome
  4. Accept Permissions
  5. The Extension will now run when in Google Docs or Canvas
Please contact me at cgurysh@pennridge.org if you would like help exploring this tool.

Reminder- 21st Century Learning Night is Tuesday, May 28.
More info can be found here


Friday, March 8, 2019

Duplicating in Canvas- One Teacher's Practice

The last edition of the Friday Five featured ways to duplicate items in Canvas. To follow-up I have asked high school English teacher, Carol Ressler, to share how she is using the process in her classes. 

This year, Carol teamed up with Physical Education teacher, Roberta Simmons for Peer Coaching. Roberta teaches the high school's cyber PE course. Roberta has shared some strategies she employs for her online class and Carol is adapting them for her face-to-face courses.

CG: How do you leverage the module structure in Canvas to organize your courses?

CR: Although I had been using the Module structure to organize my course content for my students, I wasn’t really leveraging the modules for instructional purposes.  Through working with Roberta, I developed a means to implement self-paced tutorials revolving around various topics.


Module Template-Click to see larger


CG:  Could you briefly describe how you are using module duplication to improve your workflow?

CR: The module duplication feature allows me to quickly replicate the structure of the weekly tutorial.    I have a module that is a “template.” (Shown Above)  I then duplicate the template and edit the copy and due dates as I see fit to create a “new” module. (Shown Below)  My initial effort to create an instructional module took about an hour until I was satisfied with flow and content of the module. The second week I did this, it only took me 10 minutes to edit the duplicated module structure for the entire week.   In addition, I can also import this template into other courses I teach.  Next year, I will have all of these instructional modules created.  I will just have to edit due dates/times from year to year.


Instructional Module-Click to see larger


CG: How do you think your module structure benefits students?

CR: My students benefit from this instructional practice in several ways.   The students who are proficient in the skill are able to complete the task without “waiting” for the remainder of the class to catch up.   Students who are not proficient are able to read teacher feedback and re-submit the task until the point where they demonstrate mastery.  Once students receive constructive feedback, they are talking through the concepts with other students.  On-task interaction and peer-to-peer instruction is increasing. 

CG: What tips do you have for someone who wants to implement your technique?

CR: The module feature does not allow you to duplicate if the module contains a quiz or LTI (ex: Google Cloud-Based or 365 Cloud-Based) assignment, so make sure your template does not contain them.  When you edit the duplicated template, you can simply add in a quiz in this “new” module.

CG: What do you hope to try next to further leverage the capabilities of Modules in Canvas?

CR: After I refine this practice a bit more, I hope to eventually use the Mastery Paths function of Canvas to create a more individualized learning experience.   Students who need more detailed instruction or additional practice will be directed towards activities that meet their needs, and students who demonstrate proficiency can work on a activities that provides a greater challenge or extend their learning.


SAVE THE DATE: 21st Century Learning Night is 5/28/19. Watch your email for more information. 


Thursday, February 21, 2019

Copying in Canvas: Assignment, Module,Event, Assignment, From Commons

Scribe At Work

Recently, teachers have been asking about copying items within a Canvas Course. Duplicating quizzes, assignments, and modules helps improve teacher workflow. This week's Friday Five features ways to copy different items within a single course in Canvas. 

How to Copy....


1. A Quiz- Do you need to copy a quiz to make a differentiated version?  The steps found here explain how to copy a quiz within a course. The same process can be used for copying into another course, just make sure to start in the course you would like the quiz copy to be in. 

2. A Module- Perhaps you would like to duplicate a module structure or a complete module. You can duplicate a module (if it does not contain a quiz or LTI assignment) by simply clicking on (1) the three dots to the left of a module title and then selecting (2) Duplicate. Here are full directions.


3. A Calendar Event- Are you having a special event in your class over multiple days? Create the event once and then use the Duplicate feature (found under More Options) to repeat the event for a subsequent number of days. You can even have Canvas automatically number the events for you.Here are full directions. 


4. An Assignment or A Discussion- Just like we saw with Modules, you can easily duplicate an assignment or discussion by clicking on the three dots next to the assignment and then selecting duplicate.


5. A Resource from Commons-  If you have explored Commons in the past, you saw that to fully preview a resource, you had to import it into a shell class. To make this easier you can now preview items in Commons before you copy them into a course. Here are full directions on how to do this and below is an example of how you can preview an assignment that was shared. Curious about Commons? Here is information on what Commons is and describes how it can be used to share items to other teachers in Pennridge.


Friday, January 11, 2019

End of Semester/End Of Quarter


It is time for our annual post on the semester switch. This post has important information on the End of Q2 and the First Semester. If you have any questions about copying materials for semester two, please contact me. I will be happy to set up an appointment with you.

1. Grading For Q2:  All teachers will be able to continue to grade Quarter 2 work in Canvas until February 8th. While you will be able to grade work from Q2 until February 8th, please keep your level's grading timeline in mind. If you teach a full-year course and collected something with a Q2 due date, but plan on using the assignment as a Q3 grade, make sure to change the due date to a date within Q3 so that you can still grade and provide feedback on the assignment and push it to the appropriate quarter in PowerSchool. You can change the due date after you have collected the work. 

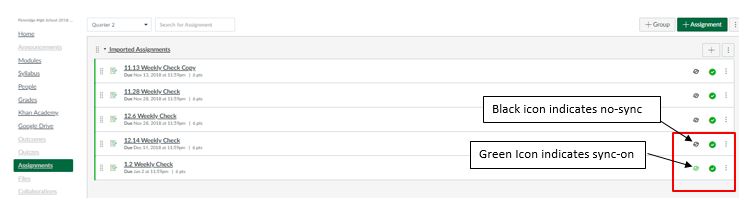
2. Turn-Off Sync for Old Assignments: To avoid any confusion, make sure to go into your Assignments in Canvas and de-select the SIS icon indicated in the picture below. This will prevent any grade changes made in PowerSchool from being over-ridden if you run a sync from Canvas. 


Click on Image to See Larger
3. Copy Course Materials: If you teach the same course second semester, you can easily copy all of your Semester 1 content to your new course. Here are directions on how to do this. Reminders:

  • If you used announcements, don't copy these
  • Select "Remove All Dates" so you start with undated content
  • Anything you copy will be copied in the same state that is in the original course (i.e., published or unpublished - you can always unpublish before or after copying)


4. Publish Your Semester 2 Courses: You must publish your second semester courses just like you did semester one. Here are directions.

5. Start of the Year Checklists: The High School and Middle School Start of the Year Checklists are great resources for the new semester

Have you and your students updated Chrome recently? Here are directions on how to make sure you are running the most recent version.

Thursday, November 29, 2018

Canvas Updates and Computer Science Education Week

This week's edition features 4 quick pieces of information regarding Canvas and an all-in-1 resource on how you can celebrate Computer Science Education week in your classroom, regardless of your subject area.

 Updated/Reminders of Canvas Features  


1. 🆕Student To-Do List- Students will now see that they only have a To-Do List on their dashboards. The Coming Up list has been eliminated. Students must remove announcements, non- collected assignment due dates, and events from their dashboards themselves. In the image to the right, the Lab 2 and Day 4 skills review will not automatically clear from the To-Do list since they are events/non-collected work.


2. 🛎️Calendar- Just a reminder, the calendar should be used to list assignment due dates, homework reminders, and key course events. Putting a daily agenda on the calendar creates clutter and confusion. This is especially true considering the  changes to the To-Do list described above. One great alternative to using a calendar event or assignment for daily lesson information is to use a whole class or section specific announcementHere are directions (make sure to see the area where you select which sections).


3. 🔜Course Cards- Beginning 12/8, teachers and students will have the ability to rearrange their course cards to an order of their liking. Users can simply pick up a course card and drag it into a position of their choice. See it in action here.

4. ℹ️ Canvas, There is an App for That!- Remember, if any Canvas iOS or Android app is being used, the user must search for Pennridge in the app via our url: pennridge.instructure.com

(Note: A Special Student Dashboard Announcement will be made soon informing students of these updates.)

Celebrate Computer Science Education Week Dec 3-9, 2018


5. 💻Computer Science For All: Hour of Code is a fantastic resource to introduce yourself and your students to coding. They have a wide-variety of hour long tutorials related to coding that have meaningful, interdisciplinary connections. For example, students in a social studies class can create a Map Tour App. In a science class, students can code to create a Public Service Announcement regarding plastic waste. Keep the website in mind for the week before winter break. You are likely to find a worthwhile, curriculum-based activity that will help you fight the inevitable pre-break distraction!

If you need help implementing any of these ideas, do not hesitate to reach out!
Cara
cgurysh@pennridge.org


Thursday, November 1, 2018

End of Marking Period- Canvas/PowerSchool Reminders

Since many of you are wrapping up marking period grades, I thought it would be a good idea to offer some reminders about passing grades from Canvas to PowerSchool. Here are 5 quick tips.

Canvas grade book. Terms
Note: Your Canvas grade book is aligned to our course terms. Assignments dated after November 7 will appear in your Q2 section of your grade book. The image to the right shows a completed course. Quarters will appear in the drop-down menu as we reach them. The drop-down menu allows you to toggle between quarters. Teachers can continue to grade a completed quarter's work in Canvas until three weeks past the quarter end.


1.📏Length of Assignment/Quiz Names📏

Remember names cannot be more than 30 characters and cannot duplicate an assignment name that already exists in PowerSchool.

2. 📅Due Date📅

Assignments must have a due date in order to sync properly

3. 🔁Sync/Resync🔁

You can sync and resync an assignment as many times as you like, however, keep in mind that if you change a grade in PowerSchool grade book and don't change the grade in Canvas, the Canvas grade will override the PowerSchool grade. To avoid this, be mindful of your workflow. Either turn of the sync for an assignment when done, or always change the grade in both places.

4. 😕 Which Assignments Are Set to Sync?😕

If you are unsure of which assignments/quizzes you have set to sync, go to the Assignments tab in your course. Any assignment/quiz that has the gear icon  (shown below) set to Green (rather than black) is set to pass back to PowerSchool the next time you hit the sync button in Canvas.

Click on Image to See Larger- Assignment listing, 5 assignments not set to sync, last assignment is set to sync

5. ✔️Always Double-Check✔️


Make sure to check PowerSchool to see that your grades came over as expected. Typically, grades pass back in a matter of minutes, but it can take up to an hour. Often the grade column comes over first and then the grades. If you ever have an issue, the best thing to do is to just try again. If you still have a problem, do not hesitate to reach out to me.

For everything you need to know about Grade Pass Back, explore this Folder of Resources.

Thursday, October 18, 2018

"Twitter-Style" Chat in Canvas and How to Make Modules More 😊

In our last edition, we saw how Discussions can be used to help students develop as Knowledge Constructors. This week highlights how one teacher is helping her students develop as Creative Communicators and Digital Citizens through Canvas Discussions.

Canvas Twitter-Style Chat


1. Melissa Osmun, reading teacher at Central Middle School, and her students have been participating in a "Twitter-Style" Chat using Canvas Discussions. (If you are unfamiliar with Twitter Chats, check out this comprehensive guide to Twitter created by a personal Twitter Favorite of mine- @cybraryman1)
Click on Image to see Larger- See Tweet here


2. Melissa's method: Melissa creates a Discussion for her class and then creates three replies to the Discussion. Each reply is a question. Students are then instructed to reply to two questions, giving students choice.

3. Benefits for the Students: While there are many benefits, adding online discussions to your tool kit provides an opportunity for  students to have time to process their ideas, makes their thinking visible to other students, and requires all students to be involved in the discussion. The online discussion feature is always a great way to give a voice to a student who may be more reserved in the whole class setting.

4. Benefits for the Teacher: Melissa can make sure that all students are involved in the Discussion and can provide specific feedback within the Discussion or through Speedgrader. Students responses are grouped together in Speedgrader which makes reviewing a snap for teachers.

And Now...just because it is fun and because I got the idea from Twitter,

5. Add Emoticons to your Module Titles to provide an element for visual discrimination and  🎉 fun 🎉. You can copy emojis from a ton of places including emojipedia.org and then place the graphic into your Module titleDestiny Beck, high school English teacher, added graphics to modules in her 9th grade English class.

Click On Image to See Larger


Thursday, October 4, 2018

Canvas As A Medium for Art

Knowledge Constructors in Advanced Art

Art and canvas makes sense, but what about art and Canvas? One of the  ISTE Standards for Students is for students to be Knowledge Constructors. Very simply put, this means students utilize various digital tools to develop their own understanding about ideas, events, or issues. They can use this knowledge to inform others, make connections, and draw conclusions. 

This week's Friday Five features Sarah Moos' use of Canvas to help her students become Knowledge Constructors

CG: Could you briefly describe the assignment?

SM: Students were examining the work of Edouard Manet. They were asked to critique two of his paintings and discuss how his style is considered impressionistic.  

CG: What was your learning goal for your students?

SM: My goal was to have students become more familiar with the work of Edouard Manet and look at his work in terms of how he influenced and help develop the impressionism style.  My goal was to have students look closely at the subject, style, color palette, brush strokes and mood of his work in order to create an evaluation.

CG: How did utilizing Canvas help your students reach that goal and how did it help you evaluate their learning?

Click on Image to Enlarge
SM: Students were able to quickly access the National Gallery of Art, where they were able to read background information about Manet and the particular painting they were studying. They also had the  ability to zoom into the painting. From there they were able to use Canvas to record their thoughts in an organized manner, including the painting they were critiquing. With ease, I was able to see the painting they were referring to and evaluate their critique. The assignment also allowed students to gather thoughts prior to a class discussion.


CG: Do you plan on doing this kind of assignment in the future? Would you change anything?

SM: I used the Assignment feature in Canvas for this assignment. I would like to begin to have students do similar assignments using the Discussion feature. This will allow students to see each other's work which will broaden the learning experience for all. 


Image Source: Manet, Woman with Cat


Friday, September 28, 2018

Canvas Organizational Tips and Dealing with Small Fonts in Windows 10

Welcome to Fall! 

September is quickly coming to an end and we are all beginning to settle into the new school year. As we work to develop routines with our students (and for ourselves), I want to share four important Canvas organizational tips and re-share a tip that will help those who have been struggling with small fonts and icons on their laptop screens.

Beginning next week, the Friday Five will move away from beginning of the year procedural and update information about Canvas and will include teacher features. Each teacher feature will reflect how Canvas and other tools are being used to support the ISTE Standards for Students. 


Add To Do Details
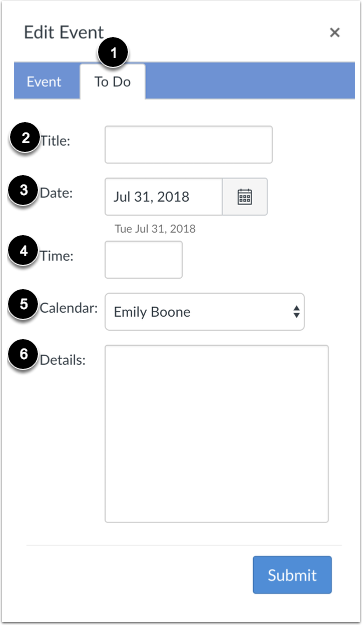
1. A New Canvas Calendar Feature: You may have noticed that when you are adding an item to a Course Calendar that you now have the option of adding a To-Do task. This new feature gives users the ability to add their own items to a calendar and is most useful for STUDENTS who want to add their own reminders for a class. For example, as the teacher, you might place an Event or Assignment on your course calendar that says "Chapter 1 Test" for the date the class will be taking the test. The STUDENTS can add "Study for Chapter 1 Test" to their personal TO-DO List for your course. Here are handy directions for students.


2. Inbox in Canvas: I am sure you have experienced a time when a student emailed you at your pennridge.us account and not your pennridge.org account. While it is possible to have pennridge.us emails forwarded to your pennridge.org account (Click Here for directions), instructing students to message you through the Canvas Inbox may be better. When a student sends you a message through Canvas, it will automatically go to your pennridge.org email. You can then respond directly from your email. This features avoids missed emails and creates a more convenient workflow for you.


3. Observers in Your Canvas Courses: Parents can create observer accounts to view their students' courses. Directions on how a parent creates an observer account can be found here. To see who is "Observing" in your courses, go to People in your course navigation. Next, select Observer from the drop-down menu to see a list of individuals. 


4. Canvas? There is an app for that: Increasingly, students and teachers have been asking how to utilize either the Canvas Student App, Teacher App, or Parent App on their smartphones or tablets. When utilizing any of the Canvas Apps the user needs to locate our instance of Canvas. To do this they must search for pennridge.instructure.com. 


5. Enlarging Size of Windows 10 Text: If you are struggling with the size of the font and icons on your laptop please follow the directions found in this link. The attached directions show you how to customize your display settings. 


Friday, September 14, 2018

Canvas: Sections and Dashboards; General Tips: Outlook Signature and Projector Remote

This Friday Five features three pieces of information on Canvas and two start of the year tech tips courtesy of the Thursday Three.


Three on Canvas.....


1. Sections!  When you teach multiple periods of the same course, in the same building, Canvas will create one course shell for that course and list each period as a section. However, these sections are listed not by friendly period numbers, but by the PowerSchool codes. You can, and likely will want to, change your section names. Here are directions on how to change section names and here is a folder full of information on how to deal with Sections in Canvas. Note: Some Middle School Special Subjects may see the same course divided between two shells. Email Cara if you would like those shells merged. Traveling teachers who teach the same course in different buildings may also email Cara to have the courses merged into a single shell.

2. More on Sections: A newer feature to Canvas is that you can now make announcements to certain sections. Previously, announcements could only be made course-wide. Here are directions on how to send section-specific announcements.

3. Dashboard View Update: Canvas users can now change the view of their dashboard. By clicking on the three stacked dots to the left of the “To-Do” list, users can select “List View”.


This list view (see image below) provides a daily list of what is happening in each course. While I prefer, the traditional view, some users may find the new view more helpful. It is important to know how to toggle between the views because if a user selects “Show More” in the “To-Do” list they will be brought to “List View”. To return to “Card View” Click on the three dots and select “Card View”.


Two General Tips...

4. Changing your Signature in Microsoft Outlook: If you need to update your signature with a new teaching assignment, new phone number, new website, etc, please follow these steps:
  • Open Outlook (make sure you are using the App Version, which is found in your start window and titled "Outlook 2016")
  • Choose File in the top Left and Scroll to Options.
  • Select Mail and Signatures (See image)
  • Remember your signature should include your building, your position, your phone number and extension, and any other information you feel would be helpful.


5. Projector Remote: Using the main teaching features on the projector remote:

  • A/V Mute button- This will allow you to put your remote to "sleep" without turning it completely off.  This will save time as you go to use it again.
  • Freeze button- This function allows you to freeze what is on the screen, so that you can go to other sites or prepare other features on your computer before sharing with the students.
  • Zoom In/Out.  Use this feature to zoom in/out of your screen.  This is especially helpful to make certain parts of your presentation enlarged during discussion.  Remember to zoom out when done. 
*Not all remotes are the same as the one pictured below, but all remotes will have these buttons!


    Friday, September 7, 2018

    Happy 2018-2019!


    To start of the year, I want to share five reminders about Canvas. 

    1. Student Usernames and Passwords: Please remember that Canvas credentials (and Office 365) follow a different naming structure. A reminder on this structure can be found here. (For security, you must be logged into your pennridge.us account to see this!)


    2. Publishing Courses: You must Publish your course by clicking on the Green Publish button on
    your course's homepage. If you do not Publish your course, students will not be able to see your class in Canvas.

    3. Adding Co-Teachers: Please make sure to add any co-teachers to your course. You can do this by going to People in your course navigation and selecting +PEOPLE. Next, enter your co-teacher's email address and select Teacher from the drop-down menu and then press ADD. 

    4. Course Navigation: In order to keep your courses clean and to limit student access, make sure to update your course navigation and hide items that you do not use. 

    5. Directions for the Start of the Year: The Start of the Year Checklist is a great tool to find directions on how to do everything above and so much more (like how to push grades to PowerSchool). The High School Start of the Year Checklist is here and the Middle School Start of the Year Checklist is here.


    I look forward to working with all of you this year. Please email me to set-up an appointment to work on Canvas or other tech integration issues I can help you with.
    -Cara

    Some Timely Reminders

    Middle School Start of the Year Checklist High School Start of the Year Checklist How to Push Grades to PTP Canvas Credentials: what y...