Friday, December 1, 2017

The Most "Busy-Ful" Time of The Year!

It is hard to believe that it is December 1st. As we enter this busy season, here are 5 tips that may help allieviate some of the seasonal chaos...


1. Save Time by Using Automatic Time Controls in Canvas!

There are a few different ways to time items in Canvas. The most commonly used are the "Available From" settings in Assignments and Quizzes, but you can also time when Modules and Annoucments are made. 

In Announcments, select Delay Posting from Options as indicated in #3 below. This will open a screen which allows you to select a date and time for an annoucement to "go live".


You also have the capability for setting an unlock date for a Module. When creating a new module select "Lock Until" to schedule its release. 


2. Impress your students by using a different App (credit goes to...Aliza F!)

Aliza recently showed me Awwapp a "freemium" virtual whiteboard that allows teachers and students to collaboratively, or individually,  draw on their screens. Aliza was using to work one-on-one with a student who needed some additional examples to master new math concepts. She simply opened the website and started writing on her screen so the student could watch the steps to solve an equation. This app would be great to use with Screen-Cast-Matic to make video lessons! Drawings can be exported as a PDF or as an image. Super easy to use and enough free features to make it worthwhile without a paying for the premium version.  It would be great for solving math problems, brainstorming, and project planning! Check it out.


3. Check on Student Access to Canvas through Analytics

Curious about how often a student accesses your course materials? Do you want to see if a student logged-in when s/he said s/he did? Use the Canvas Context Cards to help you. Here are full directions, but in the image to the right you can see how to click to access the card through the People area of your course. From the card you can check student progress and by clicking on Analytics, you can see student log-in times


4. Help Quiet your Class with a Noise Visualization!

Experiment with bouncyballs.org  to help settle down a rowdy class. This free application allows the class to "see" when they are becoming too loud.


5. Fight the Winter Blues by Trying Skype in the Classroom: 

On Tuesday, December 12th The Tuesday Ten will dedicated to exploring Skype in the Classroom. Connect with teachers and experts from around the world and host a virtual event using Skype. This has really taken off in the elementary schools and more high school teachers are expressing interest.  Check out this website regarding Skype in the Classroom which is maitained by the marvelous Erin Reichert and catalogs successful Skpe events held by Pennridge teachers.To learn more come to the next Tuesday Ten (12/12 at 2:20 in 307).Be a virtual traveler through the power of Skype. 

Locations of Pennridge Skype Locations...


Friday, November 17, 2017

Three PowerSchool Tips and Two Updates Coming To Canvas

While the theme this week may seem to be GradeBook, it is really efficiency. This Friday Five will provide you with Three Tips from Linda Bealer and Erin Reichert regarding PowerSchool and Two Upcoming Changes in Canvas. Each of these items can help streamline your workflow!

1. Is your font too small in your PowerTeacher Gradebook?

To make your text larger in gradebook, simply click on View in your toolbar, and select Zoom. You may notice the comment box/text does not get bigger with this fix.  We have looked into this issue and it continues to be unresolved.  Because of this, we suggest using the magnifier tool.  To access the magnifier tool, you can click on the small magnifying glass at the top right of your browser.  Or, you can hold down the CTRL button and use the + and - keys.  (If you have a new laptop and haven't yet changed the default font of your computer, you will want to click here.)

2.  Do you know how to run reports from the Backpack for conferences and meetings?

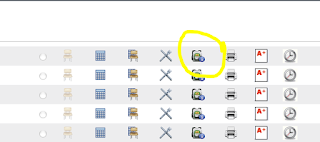
Quick Look Up-One way to run a quick report is to follow these steps for "quick look-up". This is especially quick and helpful for a parent phone call, or a student who is wondering where they are.  In the PowerSchool home-screen, click on the backpack icon.  
Select the student, and in the Select Screens drop-down menu, click on "Quick Look Up".  There you'll see grades to date, and an overall grade for the year.
.

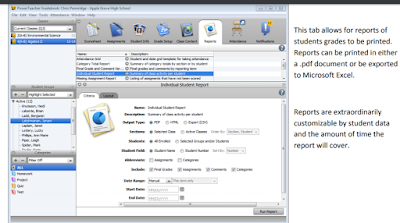
3. Do you know how to run reports from PowerTeacher Gradebook?

Another popular Report- Use the reports tab.  This will allow you to customize the report you'd like to run.
  • Make sure you've selected the correct class.
  • Choose Individual Student Report
  • Select Student and customize the screen for what you're looking for
  • OR choose "All Enrolled" to get a report for each student.

And for Canvas...beginning tomorrow you will be able to....


4. Duplicate Items in Modules!


Assignments, graded discussions, and pages can be duplicated within a module. The duplication option is located in the Settings menu for every supported module item. When a module item is copied, the word Copy is added to the end of the item name.

Duplicating a module item defaults the copied item to an unpublished status. This will likely save you the most time when wanting to Duplicate a Discussion so each period of a class has its own discussion thread. 
Modules Page Module Items Duplication Menu

5. Explore Improvements to GradeBook in Canvas


If you would like to explore the newly enhanced Canvas Gradebook, let me know and I will enable in your course(s). This new interface allows for color-coding and additional views to sort and filter assignments. To learn more about these improvements, click here.
New Gradebook with Gradebook, View, and Action menus

And lastly...enjoy your Thanksgiving Break!


Wednesday, November 1, 2017

Five Reasons Why Everyone Could be Using Newsela

The district recently purchased the PRO version of Newsela. Newsela is essentially a database of news articles and reading assessments that can be assigned to your classes. 

This edition of the Friday Five is dedicated to 5 reasons why you will fall in love with 

1. Canvas Integration: Newsela has been added to our Canvas account. This means that students and teachers can connect directly from their courses to Newsela creating a single sign-on experience. For teachers, this eliminates the need for you to create classes in Newsela, they are already there from Canvas. You can add an assignment in Canvas and select Newsela as the External Tool for submission.  For students, this means they do not need to make an account, remember a password, or open a new website. When students work in Newsela, they can do so right from within the Canvas interface. 


2. Engaging and Current Content: Newsela selects articles from a variety of publications and often has articles ready 24 hours after initial publication. If there is a hot topic in the news, odds are Newsela has an article about it. Below is a screenshot of what was posted on 10/27/17.


3. Many Articles are available in Spanish: If you have a native Spanish speaker in your class or are teaching Spanish, search for articles that have been translated. Not only will the articles be translated but so will the quiz questions. This will allow you to get data on native speakers' reading skills. 


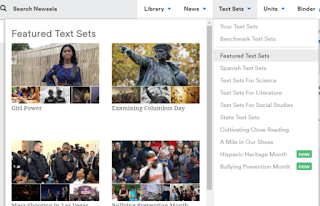
4.  Text Sets: Text Sets are curated collections of articles focused on particular topics, skills, or themes. You may use sets that have been created by others or create your own. 


5. Content for Nearly Every Discipline: Teachers can search for articles in broad categories such as War and Peace, Law, or Sports. There are also libraries of collected articles  on topics including  Careers, Myths and Legends, and  Famous Speeches. No matter what subject you teach, you can use Newsela to help engage students, explore content connected to your course, and evaluate students' reading and writing skills. 


Want to learn more now?  Follow this link and sign in to watch a great overview video.

If you have  questions about using Newsela in your classes please reach out to either Keith Veverka or me, Cara Gurysh.


Friday, October 13, 2017

Three (More) On Phones,One On Canvas, One On PowerPoint

Hopefully these phone tips never stop because being provided with three items by Diane Miller is making the Friday Five so much easier to write. Once again this Friday Five will include three on phones and two other timely tips!


Phones 


1. How do I check voicemail from outside of the district?

  1. Dial 215-453-2737
  2. Enter your ID Number followed by # (Your ID is your extension [222XXX]
  3. Enter you PIN followed by #
  4. Follow the prompts to retrieve new or saved messages or to reach set-up options
2. How do parents reach your voicemail box?

  1. Call into the main school number (HS: 215-453-6944) -or-
  2. Call 215-453-2765 which is the District-wide Faculty Voicemail Call-in Line
  3. From Either number, the caller will be prompted to enter your mailbox number or will be directed to search the staff directory

3. What if I want to learn even more about our new phones?

  1. Click here for the Cisco Self-Care Portal Quick Reference Guide
  2. Use your district username and password to log-in to the portal
  3. While much can be done right from your phone, but  the portal gives you a nice interface to accomplish basic phone tasks like:

    • Reseting Your Voicemail PIN (once you have gone through the initial set-up)
    • Forwarding All Calls
    • Setting up Phone Contacts for your personal directory
    • Changing Ringtones

The next 2 tips have to do with utilizing touchscreens for faculty and students with touch devices. 

Canvas


4. How can I use my touch-enabled device in Canvas?

SpeedGrader is a huge time-saver and you don't need to have a touch-enabled device to take advantage of it awesome features. However, if you are someone who likes to "write" on student's papers and have a touch device, this beta (meaning Canvas isn't sure that it is perfect yet) feature option may be great for you. Below is a super quick video of my attempts~note I have bad handwriting to begin with and screens do it no favors!


PowerPoint


5. How do I encourage students (9th-11th graders!) to take notes on your PowerPoint Presentations?

Students can "write" directly onto PowerPoint presentations you provide for them via Canvas. This is a great way for students to stay engaged in a presentation and create notes that help them elaborate upon the information you present, record examples you share, and practice steps you model. Below is a super-quick video demonstrating how to utilize the drawing feature in PowerPoint and here is a Microsoft Guide- Check out the shape conversion...awesome! We will explore this further during the October 24th Tuesday Ten!


Upcoming Tuesday Tens:
10/17- Screen Casting Options
10/24- Student Note taking with Touchscreens 
11/14- Skype in The Classroom


Friday, October 6, 2017

Two On Canvas; Three On Phones

This Friday Five includes information on two exciting Canvas updates and a link to a new blog introduced by Erin Reichert for the elementary level called Thursday Three. This week's edition of the Thursday Three contains important information on the new phone system! Make sure to check it out at the end of this post or by clicking here!


We will begin......


1. Canvas Rubrics- We all know rubrics help us to create consistent criteria to evaluate students. Well-crafted rubrics also provide students with clear expectations. Utilizing Canvas Rubrics is a great add-on to SpeedGrader and it is about to get even BETTER! (This change goes into effect on Saturday, 10/7/17!) (click on the images to see enlarged)


Canvas Rubrics Now Allow for Grade-Ranges


When creating a rubric, select Range and you will be prompted to enter the range of scores you will associate with a set of criteria. 

In SpeedGrader, you will see the option to select a range score. The default will be the highest range of the score, but you can override the number. The totals will automatically tally. 

For more information on using Rubrics in Canvas click here!

2. Quiz Moderator- I know many have asked about lock down browsers and these are being investigated, but new features in quiz moderation help teachers watch for cheating and, when shown to students, act a great deterrent. By selecting VIEW LOG from SpeedGrader, a teacher can see if a student stopped viewing the Canvas quiz page and do much more....(click on the images to see enlarged)


  1. Indicates the date and time the student took the quiz.
  2. Allows you to identify which attempt's log you are viewing
  3. Indicates how long it took a student to answer a particular question
  4. Lets you know if the student left the Canvas interface. 
  5. Allows you to refresh the log. This is helpful if you are viewing the log while the student is working.
For more information on how to MODERATE QUIZZES in Canvas, click here

And now for 3, 4, & 5 via The Thursday Three...


3. How to Check Voicemail from a Classroom Phone

4. Directions on How to Retrieve Voice Messages through Email

5. Utilizing the Emergency Button for a Building Emergency

Click here to learn about these great phone features.


Friday, September 15, 2017


Now that we are all back in the groove, it is time for a new Friday Five of quick tips regarding Canvas. This edition of the Friday Five includes 3 tips worth repeating, 1 fun tip, and 1 HUGE (well maybe not huge, but hopefully helpful!) announcement.


Three Tips Worth Repeating!


1. Hiding Unneeded Courses on Your Dashboard:  If you haven’t hidden courses you are likely finding your dashboard very cluttered. When your schedule is transferred from PowerSchool to Canvas, Canvas can not distinguish between a “real class” and your prep or lunch period. To hide the course shells that are for your prep or duty, follow these steps:
  • Go to Courses in your Green Navigation bar, then select All Courses
  • Click on the Star (make them orange) next to the the Courses you want to see on your dashboard
  • Return to your Dashboard and see just the classes you want to be able to access quickly
2. Renaming Sections:  Your course sections (periods) come across with PowerSchool coding rather than period numbers. To rename your sections to a more user-friendly format, follow these steps:
  • Go into a course with multiple periods (sections)
  • Click on Settings in the Course navigation, then select sections from the top of the screen
  • Click the Pencil icon next to the section you want to rename 
  • Type in a more friendly name (like period number) and hit enter. Repeat this step for all sections
3. Modules:  Utilizing Modules is the new goal for this year. Remember that if you get in the habit of adding all materials to your course through the Module interface, your course will be naturally organized for your students and for you. When utilizing Modules remember these three things:
  • If a Module is locked, students can’t get to items inside it, even if the items are published
  • When using Modules, you do not need to (and don’t want to) leave Files and Pages accessible for student access. They can get your files and pages through your Modules
  • If you haven’t done so, complete the Module on Modules in the Professional Learning Course for Module Examples, Tips, and Tricks!


Fun Tip


4. This Fun Tip is a discovery first made by Carol Ressler! This tip is totally about aesthetics, but if you have added course images to your course cards (tiles on your dashboard), you can take away the color overlay for a crisper view of your images. To do this, click on the gear icon found on the upper right of your dashboard and then deselect “Color Overlay”. This is a user setting, so feel free to wow your students by showing them how to do this on their dashboards.

Before


After


Huge Announcement


5. To further support you all in your Canvas use, in addition to Friday Fives, I am now going to offer Tuesday Tens. On select Tuesdays, I will be hosting ten minute quick overviews of key features in Canvas. These live,voluntary events will take place in the CAP Room (307) on select Tuesdays from 2:20-2:30. (I won't kick anyone out who wants to stay longer!) All events will be listed on the Professional Learning Calendar in Canvas. No need to RSVP, just show up. The first events will be:

September 19: SpeedGrader: Get a quick introduction into the time saving features of SpeedGrader. You may never collect papers again!


September 26: Course and Section Naming: Learn how to customize your course names and section names. Other account settings will also be reviewed

October 3: Module Magic: Get help making your modules magical for you and your student. Modules make everything simpler.


Monday, August 28, 2017

Welcome Back- Year Two of Canvas

Welcome Back!


Just a Five quick pieces of information as we start Year Two of our Canvas implementation.


  1. Linked here is the start of the year checklist for Canvas. It is similar to the checklist I provided last year, but includes a few demonstration videos and some information on new features in Canvas.
  2. Please remember that there is a Module on Year Two goals in the Professional Learning Course. Many of you completed the module at the end of last year.  If you haven’t competed this, it would be helpful to do so as we begin Year Two with the following Canvas goals:
    •       Demonstrate Mastery of the Year One Goals (due dates on calendar, daily agenda,    upload handouts, use syllabus page)
    •  Utilize Modules for Course organization.
  3. If you are not enrolled in the professional learning course, please email me and I will add you right away!
  4. Please remember that student Canvas log-in credential information can be found under the “For Students” tab on the high school homepage and here. Teachers can see student log-in credentials by clicking on the backpack icon in PowerSchool, selecting the student’s last name and then selecting “logins” from the drop down menu.  Canvas usernames are the students’ computer username followed by @psd.pennridge.org and the password is their network password.
  5. I will be in the CAP room (307) most periods of the day this year. Feel free to stop on in whenever you need help with Canvas or other tech integration needs. There will be students in the room, but they are working on cyber coursework, so don’t feel like you are disrupting them!

Thursday, June 8, 2017

Canvas Year End

Canvas Year End

      Preparing for 2017-18


The basic info you need to regarding Canvas Year End!
1. You will have editing access to your current (Year Long; Semester 2) courses until June 30th.
2. After June 30th, your PowerSchool courses will turn to “read only”. This means all of the content stays, but you won't be able to edit anything in the course. You will be able to move content into a new course and regain full editing capabilities!
3. You may move any of your course content into a course shell (click here for directions on creating a course shell and here for directions on how to copy content from a Canvas Course into that shell!***). This will be best to do if you would like to get working on your 17-18 courses before the PowerSchool roll-over. Once the PowerSchool roll-over occurs, you will have your official course shells for the year and can import content into the course from either a shell course, your 16-17 courses, or from the Commons. 
4. Please see me if you have any questions regarding Canvas year end! Thank you all for your hard work with Canvas this year. You all did a fantastic job with our first year...can't wait to see what everyone does next year!
5. On Monday, information regarding our Year Two goals will be shared. 

***I recommend that you use this method to move content rather than hitting the “Copy Course” button found in Course Settings. “Copy Course” will go into the 16-17 school year which will close June 30th.  A course shell will never automatically close. 

Friday, May 12, 2017

Quick Follow-Up to Canvas Survey

First, thank you all for completing the Canvas survey. We are still going through the responses, but there were a couple of items that I thought I would quickly address.


Friday Five: Quick Responses to Canvas Survey Items!

  1. Finding Student Credentials:  Next year, the login sheet that students get on the first day of school will clearly indicate that student’s Canvas credentials and 365 credentials are the same. Students also have access to the log-in credential  structure on the high school home page under the Student’s tab. These credentials are slightly different than what we have used in the past.
  1. Canvas for Clubs: One response asked about using Canvas for clubs. This is absolutely a possibility and something that is already being done by Key Club and NHS. Any teacher can create a course from the “Start a New Course” button on the lower right of the teacher dashboard. Advisors can then either give students a link to join the course or add each member to the course manually. If you are an advisor and would like help with this, let me know!
  1. Quiz Security:  There were a few comments about creating secure environments for testing on a computer.. There are ways to password protect and lock a quiz. Please see me if you would like to explore these features. People also asked about lockdown browsers which would disable other functions on students’ computer while they complete online assessments. This issue continues to be explored.
  1. Canvas in the Summer🌊:  This was a big question: Will I be able to work in Canvas over the summer?  The answer is yes! Your 2017-18 PowerSchool created courses will not be there until the year roll-over occurs (this usually happens sometime in July), but you will be able to build in a shell course and then move everything over. You will also be able to copy everything from your current PowerSchool created courses. Please note, that you will not want to build in your 16-17 PowerSchool courses after June 30th. At this time they become read only which means that you can see and copy everything, but you will  not be able to edit those courses. Here is a video that demonstrates how to copy a course and here are printable directions.
  2. Further Support:   I will be in the CAP room for most of the school day next year. I am in the room to help support our cyber program and to help teachers with Canvas and other tech integration questions. Please do not hesitate to call, email, or stop in. Taking this step is the best way to make sure your individual needs and questions are being addressed. If you don’t have time to stop in or don’t know how to set something up, tell me what you want to do and I can hop into your course and set it up for you or walk you through the steps via phone, email, or one of my awesome videos!😃😃😃

Friday, April 7, 2017

What Does She Do In There All Day?

About once a week a student shows up at my door saying, “Wow, this room has a carpet...what goes on in here?” Who knew that a carpet in a classroom would be worthy of such note! I laugh and explain the purpose of the CAP room.

How many of you have had similar thoughts and also wonder, “What does Cara do in there all day?”

Well, in addition to helping teachers utilize Canvas and other technology integration tools, I am working to build our district's cyber program. (I would be remiss to not take a moment to thank the Guidance Department, the HS Admin team, the Entire Curriculum Office, and Roberta Simmons for their help with all of this!)

Pennridge School District can now provide a cyber option for students in Kindergarten through Twelfth Grade!

How you can help? If you ever hear of a student considering cyber...let the student's guidance counselor know!

For an overview of the program watch this video made with Adobe Spark


This Friday Five is 5 facts about our cyber program with some tech tools examples and resources thrown in.


Pennridge Online Learning is….


1. Predicated on Comprehensive Plan goals

    • The Comprehensive Plan includes the following goal: Offer opportunities for students to take courses using a blended model with cyber courses.
2. Personalized and designed to meet the needs of all learners
    • Students who are participating in Pennridge Online Learning have the flexibility of taking some courses online and some courses face-to-face
    • Check out our Website built with the new, easier to use Google Sites
3. Proving Effective 
    • Early data indicates that our new program is providing a better learning experience for our online learners than our previous program  
2014-15 First Semester Grades
2016-17 First Semester Grades
    • When you factor out the students who were "grandfathered" into cyber or admitted outside of the new procedures, the failure rate drops to about 2%
4. Providing Cost Avoidance
    • Each time a student leaves PSD to attend a cyber-charter money leaves with them. The table below illustrates how our cyber program can provide savings. 

5. Promoting College and Career Readiness

IMG_0073.jpg

Friday, March 24, 2017

Student Communication and Feedback in Canvas

Ryan Wallace, like all great social studies teachers, can't help but pick up reading materials along his travels. Recently, on a field trip with FBLA to Bucks County Community College, Ryan picked up the student newspaper. Was he longing for his college years, feeling nostalgia for the printed press, or lured by the lead story? It was clearly the story, "The In's and Out's of Canvas." Channeling his inner Ed Johnson (if you are too new to our faculty to get this reference, ask one of us older folks), Ryan passed the article on to me! It focuses on the ease students have tracking their course progress when professors are utilizing Canvas.


Inspired by the article (thank you Ryan!) and some recent FAQS, this Friday Five is a list of tips you can share with your students to help them better utilize the interface. These tips are also being shared with students via their “Class of” course!


1. Calendar from the Classroom Homepage: Students can gain direct access to their course calendar from the homepage of the individual course. This makes focusing on just one class easier. Screenshot credit to Roberta Simmons!calendar arrow.PNG.

2. Specific Feedback on Assignments: Students can see detailed feedback on an assignment in the by clicking on the View Feedback Button from the submission details page. Below is an image of the page and button to press. Linked here are full directions.

submission details.PNG

3. General Comments on An Assignment: Students can also see general comments and rubric details from the Grades link in course navigation. Make sure you have Grades accessible in your course navigation! Below is a snapshot of what they see and linked here are directions on how to access this information.
rubric.PNG

4. To Do and Coming Up Lists: These lists give students (and teachers) a quick glimpse into their courses. From the Dashboard, the list will include items from all courses. From a course homepage, the list will only include information for that course. Remember, the To-Do list includes items with a due date in the next seven days. The Coming Up list includes assignments and events that are coming up in the next seven days. For more info check out this resource. Screenshot credit to Heidi Kulik!
to do list.PNG

5. Notifications:  It is important to remind students that they can receive notifications from Canvas via text or email. Most students were shown this when they picked up their laptops, but it is worth reminding students of this helpful feature. Linked here is info on how to set-up Canvas notifications.


BONUS: SAVE THE DATE! 21st Century Learning Night is Tuesday, May 30th. Check out our new website. More details to come!


Have a great weekend everyone!


Some Timely Reminders

Middle School Start of the Year Checklist High School Start of the Year Checklist How to Push Grades to PTP Canvas Credentials: what y...