Friday, September 28, 2018

Canvas Organizational Tips and Dealing with Small Fonts in Windows 10

Welcome to Fall! 

September is quickly coming to an end and we are all beginning to settle into the new school year. As we work to develop routines with our students (and for ourselves), I want to share four important Canvas organizational tips and re-share a tip that will help those who have been struggling with small fonts and icons on their laptop screens.

Beginning next week, the Friday Five will move away from beginning of the year procedural and update information about Canvas and will include teacher features. Each teacher feature will reflect how Canvas and other tools are being used to support the ISTE Standards for Students. 


Add To Do Details
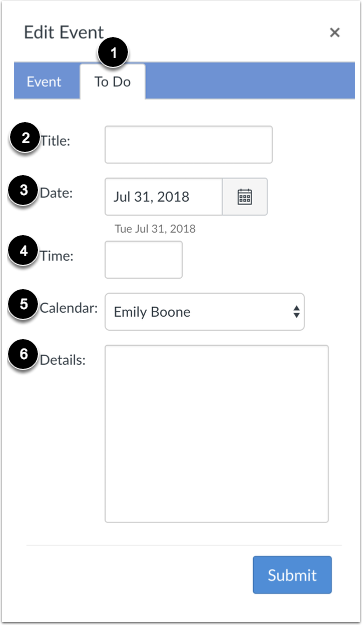
1. A New Canvas Calendar Feature: You may have noticed that when you are adding an item to a Course Calendar that you now have the option of adding a To-Do task. This new feature gives users the ability to add their own items to a calendar and is most useful for STUDENTS who want to add their own reminders for a class. For example, as the teacher, you might place an Event or Assignment on your course calendar that says "Chapter 1 Test" for the date the class will be taking the test. The STUDENTS can add "Study for Chapter 1 Test" to their personal TO-DO List for your course. Here are handy directions for students.


2. Inbox in Canvas: I am sure you have experienced a time when a student emailed you at your pennridge.us account and not your pennridge.org account. While it is possible to have pennridge.us emails forwarded to your pennridge.org account (Click Here for directions), instructing students to message you through the Canvas Inbox may be better. When a student sends you a message through Canvas, it will automatically go to your pennridge.org email. You can then respond directly from your email. This features avoids missed emails and creates a more convenient workflow for you.


3. Observers in Your Canvas Courses: Parents can create observer accounts to view their students' courses. Directions on how a parent creates an observer account can be found here. To see who is "Observing" in your courses, go to People in your course navigation. Next, select Observer from the drop-down menu to see a list of individuals. 


4. Canvas? There is an app for that: Increasingly, students and teachers have been asking how to utilize either the Canvas Student App, Teacher App, or Parent App on their smartphones or tablets. When utilizing any of the Canvas Apps the user needs to locate our instance of Canvas. To do this they must search for pennridge.instructure.com. 


5. Enlarging Size of Windows 10 Text: If you are struggling with the size of the font and icons on your laptop please follow the directions found in this link. The attached directions show you how to customize your display settings. 


Friday, September 14, 2018

Canvas: Sections and Dashboards; General Tips: Outlook Signature and Projector Remote

This Friday Five features three pieces of information on Canvas and two start of the year tech tips courtesy of the Thursday Three.


Three on Canvas.....


1. Sections!  When you teach multiple periods of the same course, in the same building, Canvas will create one course shell for that course and list each period as a section. However, these sections are listed not by friendly period numbers, but by the PowerSchool codes. You can, and likely will want to, change your section names. Here are directions on how to change section names and here is a folder full of information on how to deal with Sections in Canvas. Note: Some Middle School Special Subjects may see the same course divided between two shells. Email Cara if you would like those shells merged. Traveling teachers who teach the same course in different buildings may also email Cara to have the courses merged into a single shell.

2. More on Sections: A newer feature to Canvas is that you can now make announcements to certain sections. Previously, announcements could only be made course-wide. Here are directions on how to send section-specific announcements.

3. Dashboard View Update: Canvas users can now change the view of their dashboard. By clicking on the three stacked dots to the left of the “To-Do” list, users can select “List View”.


This list view (see image below) provides a daily list of what is happening in each course. While I prefer, the traditional view, some users may find the new view more helpful. It is important to know how to toggle between the views because if a user selects “Show More” in the “To-Do” list they will be brought to “List View”. To return to “Card View” Click on the three dots and select “Card View”.


Two General Tips...

4. Changing your Signature in Microsoft Outlook: If you need to update your signature with a new teaching assignment, new phone number, new website, etc, please follow these steps:
  • Open Outlook (make sure you are using the App Version, which is found in your start window and titled "Outlook 2016")
  • Choose File in the top Left and Scroll to Options.
  • Select Mail and Signatures (See image)
  • Remember your signature should include your building, your position, your phone number and extension, and any other information you feel would be helpful.


5. Projector Remote: Using the main teaching features on the projector remote:

  • A/V Mute button- This will allow you to put your remote to "sleep" without turning it completely off.  This will save time as you go to use it again.
  • Freeze button- This function allows you to freeze what is on the screen, so that you can go to other sites or prepare other features on your computer before sharing with the students.
  • Zoom In/Out.  Use this feature to zoom in/out of your screen.  This is especially helpful to make certain parts of your presentation enlarged during discussion.  Remember to zoom out when done. 
*Not all remotes are the same as the one pictured below, but all remotes will have these buttons!


    Friday, September 7, 2018

    Happy 2018-2019!


    To start of the year, I want to share five reminders about Canvas. 

    1. Student Usernames and Passwords: Please remember that Canvas credentials (and Office 365) follow a different naming structure. A reminder on this structure can be found here. (For security, you must be logged into your pennridge.us account to see this!)


    2. Publishing Courses: You must Publish your course by clicking on the Green Publish button on
    your course's homepage. If you do not Publish your course, students will not be able to see your class in Canvas.

    3. Adding Co-Teachers: Please make sure to add any co-teachers to your course. You can do this by going to People in your course navigation and selecting +PEOPLE. Next, enter your co-teacher's email address and select Teacher from the drop-down menu and then press ADD. 

    4. Course Navigation: In order to keep your courses clean and to limit student access, make sure to update your course navigation and hide items that you do not use. 

    5. Directions for the Start of the Year: The Start of the Year Checklist is a great tool to find directions on how to do everything above and so much more (like how to push grades to PowerSchool). The High School Start of the Year Checklist is here and the Middle School Start of the Year Checklist is here.


    I look forward to working with all of you this year. Please email me to set-up an appointment to work on Canvas or other tech integration issues I can help you with.
    -Cara

    Friday, June 1, 2018


    Year 2 of Canvas is Coming to an End!

    1. You will have editing access to your current (Year Long; Semester 2) courses until June 30th.
    2. After June 30th, your PowerSchool courses will turn to “read only”. This means all of the content stays, but you won't be able to edit anything in the course. You are able to move content into a new course and regain full editing capabilities!
    3. If you would like to work on your courses prior to the 18-19 PowerSchool roll-over (late July), you may move any of your course content into a course shell (click here for directions on creating a course shell and here for directions on how to copy content from a Canvas Course into that shell!). I suggest you select "Remove all Dates" when copying. Once the PowerSchool roll-over occurs, you will have your official courses for the year and can import content into those courses from either a shell course or your 17-18 courses.
    4. Please see me if you have any questions regarding Canvas year end! Thank you all for your hard work with Canvas this year. 
    5. Year 3 goals.....TBA....looking to make it personal!

    REMINDER: Please remember to register for our end of the year PD days and Trade Day in OTS!

    Friday, May 11, 2018

    Canvas- Teacher Appreciation Week!


    Happy Friday and Happy Teacher Appreciation Week!

    Our friends at Canvas have shared a special homepage template to say thank you to all Canvas Teachers! 

    This will be a great resource to tuck away and use when you begin to plan your courses for next year!

    To access the free homepage template, follow the directions found here. 

    This template provides:

    1. A Homepage with editable course title, course banner and "welcome" text placeholder
    2. Three customizable buttons: About Your Teacher | Class Resources | Learning Modules
    3. Directions on how to modify template buttons and banner
    4. "Welcome to Class" student module with content page templates: "About Your Teacher" and "Class Resources"
    5. Finally, the first PHS teacher reader of this post who emails Cara Gurysh will receive a special Canvas gift!


    FYI: Banner on top of this post was created with Canva....I LOVE Canva

    Friday, May 4, 2018

    Collaboration: Great for Students and for Teachers!

    May is a challenging month. Keystone testing, AP testing, field trips, dress code issues, prom drama...the list is endless.

    This time of year requires team work.

    Collaboration (among students and teachers) will bring success!


    1. What to do?: Angela Schoettle recently developed a project for her new course, A People's History. Her unit of study was "Women's History".  Angela asked me if I could suggest any tech tools for a new project. Instead of focusing on the tech tools, we ended up collaborating on the goals of her project.

    2. Keep Students Engaged: Angela's goal was to create a more student-centered unit. The image above  is a powerful visual of the type of project-based, collaborative experience she wanted to provide her students.Once we had the goals established, we selected to have students use "The New Google Sites".

    3. Project Launch: To get her students set and interested in the topic, they first collaborated on an analysis of old history textbooks. After collecting books from the "book dungeon," colleagues, the library, and her personal library, Angela had students review how women were represented in textbooks from different eras. A meaningful project launch helps generate student interest in the learning goals.

    4. Project: Students were, as a class, tasked with collaborating to create an improved resource regarding women's history. As a large group, they had to decide on what types of information they wanted to include (videos, primary sources, timelines) and agreed on a format for presenting the information via a New Google Website. Once they defined the overall parameters of the project, smaller groups of students collaborated on different eras of Women's History.

    5. Finished project and more collaborating:  Here is a look at what the students developed. Read, Write, Think was used to create the timelines. Check out really strong examples on the 1970s, 1940s, and 1920s pages. The 1990s page is an example of the template the students created for each page.  As a collaborative teacher, Angela has shared her idea with her colleagues. At least two other teachers are going to use this basic project idea as a fresh and collaborative way to help their students (and themselves) have a meaningful end of year experience. If you have questions, about Angela's project, reach out to either one of us! We would both be happy to share (collaborate!).

    Friday, April 13, 2018

    21st Century Learning Night

    Top 3 Reasons to Come to 21st Century Learning Night

     and 

    2 Sneak Peeks!

    This Friday Five is brought to you by the Thursday Three (Thank You Erin Reichert and Chris Brockman). To keep with the Five format I have added two sneak peeks! Make sure to read about Act 48 and How to register to present! Questions, see/email me (Cara), Erin, or Chris!

    1.  Last year we had over 40 faculty presenters, over 800 attendees, and it is one of the top events the Curriculum Office organizes each year!  

    In addition, we have raffles and door prizes for all presenters and guests!

    2.  Many teachers invite students who "run" the table and to help showcase the topic.  Those students feel honored to be asked to come and share their work, as well as gaining a feeling of community.   Typically their parents feel very honored and happy to bring them on the night of the event.

    In addition, have your considered signing up with another teacher?  By doing so, this allows you to take turns at the table, which allows you time to explore the other exhibits!

    3.  As a spectator, you're able to get ideas to engage your students and may see something that you have "never thought of before".   

     In addition, your students (past and present) will love seeing you roaming the exhibits!   As a spectator, consider bringing your own family with you! 

    4. First Sneak Peek- Jeremy Friedman and The Daily Ramble Crew

    The team will be giving special tours of their new studio! See first hand how the Ramble students put together the daily show and special segments. Perhaps you will be featured on an upcoming episode! .

    5. Second Sneak Peek- Ignite Talks- Brooke Burgy and the Humanities Team (Angeli, Brown, Flanagan, Russell)

    Teachers and students will be showcasing students' individual research through Ignite Presentations. Brooke's 11th grade English classes prepared talks as n entry activity to their study of Anthem . Some of her students presented live and other used Screencastify to record their talks.  Humanities students are preparing to share Ignite-style presentations of their DaVinci Day Projects.

    *And if all that is not enough- teachers get Act 48 hours, as well as 4 hours of pay for signing up as a presenter!  (More information in regards to these 2 items will come out in May after final teacher registrations are complete!)

    If you are able to present, please fill in the form by May 1st. 

    Click here for the 21st Century Learning Night website to see pictures and videos from the past, and to see some of what's in store for this year's event! Follow us on Twitter @psd_21cenlearn

    Friday, March 16, 2018

    Canvas Updates: Announcements


    Announcements are a great way to communicate with your students in Canvas. Up until this week they have had one major drawback, not being able to differentiate announcements by section. 


    Well now you can!!
    Read about this and other updates to Announcements in Canvas

    (Click on the images below to see them better!)

    1. One Section, Two Sections or All Sections!

    When creating an announcement, teachers can now designate which section they would like to view the announcement. Students will only be able to see the announcement that is sent to the section* in which they are enrolled.


    * Remember you can rename your sections from the PowerSchool Coding to our period numbers. Here are the directions.

    2. No Comments is the New Default.

    The default setting for announcements is now set so students cannot make comments in response to an announcement. If you would like this functionality, you must activate when creating an announcement. 


    3. Change your mind about comments? No Problem!

    Comments can be allowed or disallowed from your announcement area of your course.


    4. Profile pictures will display next to Announcement.

    When you make an announcement your profile picture will post next to it. This is really nice if you co-teach a class. Students can easily see which teacher shared information. Below is a picture from Cyber PE. Roberta Simmons is the teacher, but I occasionally post announcements. You can see our two different pictures in the image below. If you haven't uploaded a profile picture give it a try. Here are directions. 


    5. Announcements next year?

    Just a reminder, when you copy your course from this year to next year, you won't want to copy announcements. If you do, all of your previous announcements will load at once. Instead, copy and paste announcements from a previous course shell into the new course shell if and when you need them. 


    Friday, March 2, 2018

    A Monday Friday Five: PowerSchool News and Canvas Users Day

    Happy Monday Everyone! 

    With the craziness of Friday, this post was delayed! In light of the "so wrong" forecast we just experienced, I thought the clip below might help you rebuild your trust in local meteorologists.


    So Here We Go With Our Delayed Five!

    1. PowerSchool GradeBook- Email Feature!

    The PowerSchool GradeBook Parent email feature has been fixed. The feature will now send you a copy of the email to your pennridge.org email. This peice of this feature had been "broken." Huge thanks go to the IT team and Charlie Lainhart for helping to troubleshoot and solve this ongoing issue.  Linked here are directions on how to send emails through your PowerTeacher Gradebook.

    2, 3 and 4. Bucks County IU Canvas Users Day

    Staci Klemmer, Jessica Saylor and I presented about using Canvas to improve teacher workflow at the IU last Thursday. Below is our presentation. Staci and Jess did an awesome job sharing to about 100 other teachers from our area.  Check out our presentation below. Make sure to play Jess's video found on SLIDE 13. 


    5. Volunteers!


    I am looking for 3-4 volunteers to help me with a special project for an upcoming edition of the Friday Five. Email me at cgurysh@pennridge.org if you are interested!

    Friday, February 16, 2018

    Valentine's Friday Five- Calm: Free Mindfulness App


    Calm - Free for Teachers

    My original thought was to focus this Friday Five on things to love. Ideas I had included collaboration tips to "love your colleagues," device tips to "love your computer,"  and, of course, lms tips to "love Canvas."  However, writing this in the aftermath of the most recent school shooting, made it clear that an entire post about a free tool that can help us all relieve stress, build resiliency, and increase patience was far more timely. Calm is an iOS, Android, and Web App that provides individuals with guided meditation and mindfulness exercises. 

    The Calm School Initiative is working to provide this powerful tool free to every teacher in the world. 

    The Atlantic published this article that describes many of the benefits of mindfulness in schools. Included in the piece is a discussion of the growing body of scientific reasearch on the postive effects of mindfulness including improved attention, reduction of stress, and a growth in "capacity of compassion and empathy."

    For more information on how to get your free access to this powerful tool, click here.

    We will continue to keep the entire Parkland community in our thoughts. 


    * I made the Valentine's graphic with Canva. Canva is an awesome and (mostly) free graphic design web tool.

    Tuesday, January 16, 2018

    Semester 2- Attention Semester Course Teachers


    You may remember this image and topic from last year, but this information is worth repeating as we close out Semester One of the 2017-18 School Year! To further assist you as you begin the final semester, here is the link to the start of the year checklist which has great reminders and tips for setting up your courses.


    1. Grades in your First Semester Course-  You will be able to continue to grade work and push those grades to Powerschool (if you are utilizing the grade push) until January 31. This corresponds with the grading timeline that Alice sent out. After January 31 you will have read-only access to your course material. This means you can see all of your assignments, files, discussions, student work, etc. but you can’t edit within the course. To edit the content you would need to copy it into a new course (see #2)!

    1. Copy Course content to New Semester Course- If you teach the same course second semester you can easily copy all of your Semester 1 content to your new course. Here are directions on how to do this. Once again, here is the start of the year checklist which may be helpful as you set up your new semester courses.

    1. Semester Course Content Next Year-  You will also be able to copy any course content from a semester course (or Year Long Courses, too) into the PowerSchool created courses you will teach next year. Don’t worry- Your work first semester will not disappear!

    1. Don’t forget to Publish Your Semester Two Courses-  You must publish your second semester courses just like you did semester one. Here are directions.

    1. Semester 2 Try Something New!-  Please stop in and see me in room 307 if you would like to review how you have used Canvas in semester 1 and discuss ways to expand upon your use in Semester 2.  Things to consider: collecting assignments through Canvas, Cloud-based assignments through 365 or Google, Discussions, Group Assignments, or Utilizing External Tools (Turnitin, CK12, Newsela).

    Some Timely Reminders

    Middle School Start of the Year Checklist High School Start of the Year Checklist How to Push Grades to PTP Canvas Credentials: what y...