Friday, September 28, 2018

Canvas Organizational Tips and Dealing with Small Fonts in Windows 10

Welcome to Fall! 

September is quickly coming to an end and we are all beginning to settle into the new school year. As we work to develop routines with our students (and for ourselves), I want to share four important Canvas organizational tips and re-share a tip that will help those who have been struggling with small fonts and icons on their laptop screens.

Beginning next week, the Friday Five will move away from beginning of the year procedural and update information about Canvas and will include teacher features. Each teacher feature will reflect how Canvas and other tools are being used to support the ISTE Standards for Students. 
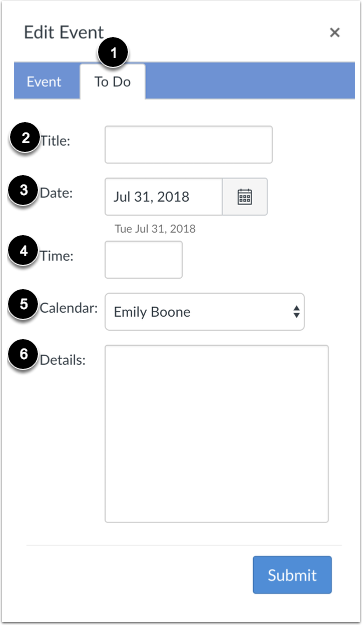


Add To Do Details
1. A New Canvas Calendar Feature: You may have noticed that when you are adding an item to a Course Calendar that you now have the option of adding a To-Do task. This new feature gives users the ability to add their own items to a calendar and is most useful for STUDENTS who want to add their own reminders for a class. For example, as the teacher, you might place an Event or Assignment on your course calendar that says "Chapter 1 Test" for the date the class will be taking the test. The STUDENTS can add "Study for Chapter 1 Test" to their personal TO-DO List for your course. Here are handy directions for students.


2. Inbox in Canvas: I am sure you have experienced a time when a student emailed you at your pennridge.us account and not your pennridge.org account. While it is possible to have pennridge.us emails forwarded to your pennridge.org account (Click Here for directions), instructing students to message you through the Canvas Inbox may be better. When a student sends you a message through Canvas, it will automatically go to your pennridge.org email. You can then respond directly from your email. This features avoids missed emails and creates a more convenient workflow for you.


3. Observers in Your Canvas Courses: Parents can create observer accounts to view their students' courses. Directions on how a parent creates an observer account can be found here. To see who is "Observing" in your courses, go to People in your course navigation. Next, select Observer from the drop-down menu to see a list of individuals. 


4. Canvas? There is an app for that: Increasingly, students and teachers have been asking how to utilize either the Canvas Student App, Teacher App, or Parent App on their smartphones or tablets. When utilizing any of the Canvas Apps the user needs to locate our instance of Canvas. To do this they must search for pennridge.instructure.com. 


5. Enlarging Size of Windows 10 Text: If you are struggling with the size of the font and icons on your laptop please follow the directions found in this link. The attached directions show you how to customize your display settings. 


Friday, September 14, 2018

Canvas: Sections and Dashboards; General Tips: Outlook Signature and Projector Remote

This Friday Five features three pieces of information on Canvas and two start of the year tech tips courtesy of the Thursday Three.


Three on Canvas.....


1. Sections!  When you teach multiple periods of the same course, in the same building, Canvas will create one course shell for that course and list each period as a section. However, these sections are listed not by friendly period numbers, but by the PowerSchool codes. You can, and likely will want to, change your section names. Here are directions on how to change section names and here is a folder full of information on how to deal with Sections in Canvas. Note: Some Middle School Special Subjects may see the same course divided between two shells. Email Cara if you would like those shells merged. Traveling teachers who teach the same course in different buildings may also email Cara to have the courses merged into a single shell.

2. More on Sections: A newer feature to Canvas is that you can now make announcements to certain sections. Previously, announcements could only be made course-wide. Here are directions on how to send section-specific announcements.

3. Dashboard View Update: Canvas users can now change the view of their dashboard. By clicking on the three stacked dots to the left of the “To-Do” list, users can select “List View”.


This list view (see image below) provides a daily list of what is happening in each course. While I prefer, the traditional view, some users may find the new view more helpful. It is important to know how to toggle between the views because if a user selects “Show More” in the “To-Do” list they will be brought to “List View”. To return to “Card View” Click on the three dots and select “Card View”.


Two General Tips...

4. Changing your Signature in Microsoft Outlook: If you need to update your signature with a new teaching assignment, new phone number, new website, etc, please follow these steps:
  • Open Outlook (make sure you are using the App Version, which is found in your start window and titled "Outlook 2016")
  • Choose File in the top Left and Scroll to Options.
  • Select Mail and Signatures (See image)
  • Remember your signature should include your building, your position, your phone number and extension, and any other information you feel would be helpful.


5. Projector Remote: Using the main teaching features on the projector remote:

  • A/V Mute button- This will allow you to put your remote to "sleep" without turning it completely off.  This will save time as you go to use it again.
  • Freeze button- This function allows you to freeze what is on the screen, so that you can go to other sites or prepare other features on your computer before sharing with the students.
  • Zoom In/Out.  Use this feature to zoom in/out of your screen.  This is especially helpful to make certain parts of your presentation enlarged during discussion.  Remember to zoom out when done. 
*Not all remotes are the same as the one pictured below, but all remotes will have these buttons!


    Friday, September 7, 2018

    Happy 2018-2019!


    To start of the year, I want to share five reminders about Canvas. 

    1. Student Usernames and Passwords: Please remember that Canvas credentials (and Office 365) follow a different naming structure. A reminder on this structure can be found here. (For security, you must be logged into your pennridge.us account to see this!)


    2. Publishing Courses: You must Publish your course by clicking on the Green Publish button on
    your course's homepage. If you do not Publish your course, students will not be able to see your class in Canvas.

    3. Adding Co-Teachers: Please make sure to add any co-teachers to your course. You can do this by going to People in your course navigation and selecting +PEOPLE. Next, enter your co-teacher's email address and select Teacher from the drop-down menu and then press ADD. 

    4. Course Navigation: In order to keep your courses clean and to limit student access, make sure to update your course navigation and hide items that you do not use. 

    5. Directions for the Start of the Year: The Start of the Year Checklist is a great tool to find directions on how to do everything above and so much more (like how to push grades to PowerSchool). The High School Start of the Year Checklist is here and the Middle School Start of the Year Checklist is here.


    I look forward to working with all of you this year. Please email me to set-up an appointment to work on Canvas or other tech integration issues I can help you with.
    -Cara

    Some Timely Reminders

    Middle School Start of the Year Checklist High School Start of the Year Checklist How to Push Grades to PTP Canvas Credentials: what y...